Showing posts with label DIY. Show all posts

Tuesday, March 4, 2014

Play kitchen hot pads


I was having a serious case of the Mondays yesterday.. Ty and I decided to whip these up during Embers nap to feel better. He picked out the material and the ribbon. (I think he did a really good job!) Now he has his own hot pads and doesn't have to borrow mine when ever he cooks dinner in his kitchen. When Ember woke up she was equally in love with them. It was like playing with a brand new kitchen for both of them... Maybe soon I will make some matching towels and aprons... maybe:)

They are two 7 by 7 inch squares sandwiched between a layer of warm and natural with a two inch folded ribbon for hanging. Finish withed two top stitches.

Tuesday, February 25, 2014

DIY doll house pillows


I saw this and this and knew right away that I wanted to make one for Ember.... After one I thought... well maybe she needs four. They are just so cute and don't take much fabric.

 My grandma gave me these fabric rolls about a year ago. They have been sitting in my stash waiting for just the right project. I thought they would be perfect for these little houses. They didn't take much. I could probably still make 15 more.... but I guess I'll stop at four. Maybe I'll make some for some little girl birthdays or baby showers. I think I may be addicted to them.

 I didn't have a tutorial or pattern to use. I thought about making one.... but they are pretty simple.. If there are any requests I might. But its really cut and sew. There is no messing up. They can all be different and charming in their own way... and hey if you want a heart for a window..then why not! Its cute... use your imagination!

I think they are so charming and maybe the best thing I have ever made out of scraps. I need to go get a little basket and throw them and a few treats in for Ember for Easter.

I got thinking after making these. I look at all my sewing notions differently now. All my buttons and ribbons...the lace and rickrack.  Its all just sitting there waiting to be made into something. Right now I have no idea but some day...when the time is right and with the right material it will become something wonderful. All I need is the right inspiration and time. :) Tell then they sit and wait... looking cute in their little jars and cans on my sewing desk... Patiently staring at me.

Wednesday, February 19, 2014

DIY memory/matching game


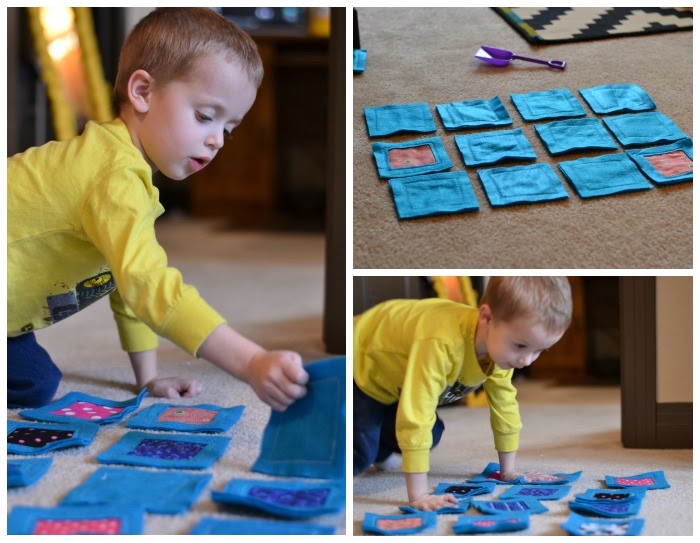
I saw this memory game on pinterest and thought Ty might like it. He is a bit small to catch on to the memory part of it but he likes to match them. After I finished making it Jayson and I played for a minute and waited for Ty to want to join in. He eventually ran over and wanted to try. He thought it was pretty cool for about two minutes. Then Ember took over. She mostly just stacks them and re-stacks them. Either way they are being used!

I cut out 24/ 5" squares. You will need one for the back and one for the front.

 Take 12 of them and make a 3" hole. I traced them out with marker then used an exacto knife and scissors.

Cut out 24/ 4" fabric squares. Make sure to do it by doubles. You will need two of each.


Add a stitch to connect them and start playing.

Ty thought it was pretty cool. He likes to flip them all over and when he sees two of the same he matches them up. So he is combining the two ideas..haha He did keep saying

"thanks mom for my new game"
"mom these are pretty softer"
"mom, why is there so many"
"mom we make fun stuff" -- my favorite!

I cut it down to six and played the matching game with him! He would put the one that matched and place it on top of the other.

Tuesday, October 1, 2013

DIY Halloween finger puppets


I'm not usually that into Halloween but the kids make it O so much fun! They love their quiet book finger puppets so I thought some Halloween themed ones would be fun for this year.


I pulled out all my felt scraps....


Cut some scary finger puppet shapes.


Sewed them all together...I am lazy and I used white thread for all. I also suggest sewing them all together before you start to add eyes and layers or your sewing machine foot might be too big to get close to the edge.


I used good ol hot glue to attach everything.


 Ty was helping me and couldn't wait tell we were done to start playing with them!


On the cat and witch I put a dab of glue down then laid sewing floss down for the hair and whiskers... Then I added the nose and hat to cover it up. Now looking at the witch I think purple floss would be cute for the hair.


The kids love them and they were only an hour project! I think they need a place to stay. Maybe a pumpkin or a haunted house... I'll work on it and share later.


Monday, September 9, 2013

1-2-3-4-5


Jayson was watching the football game, Ember was sleeping and Ty well Ty was just being Ty. . . Everyone was doing their own thing so I thought I would cross one of my pinterest projects off my list. I love Sew much Ado. She made the most adorable felt flash cards...Hers are pretty fancy, my version is pretty basic but believe me Ty still loves them.


I didn't want to buy anything for this project. I wanted to use things I already had in my craft boxes. I had two felt pages the same color so they became the base of the flash cards.


I cut them 3x5 with a rotary cutter and mat.


Pulled out some scraps for the numbers and shapes. Yes, I totally keep my scrap felt in bread bags...Works great! Thanks mom for the good tip!


Found some colors I liked and pulled them out. I traced out the numbers with a disappearing ink pen. That way I didn't have to print out a pattern.


They are not even close to perfect, but I think Ty will still learn his numbers with them! The ink also goes away with in a few hours.


I sewed the numbers on with white thread. See how you can't see the ink on the 1 anymore! I also sewed on shapes. I put the numbers on top of the shapes and hole punched them. I used a regular paper hole punch and punched through the felt. It worked fine but had to do one layer at a time. Then I pinned them together and sewed around the edges.


Put a ring through the holes and it makes a cute little flashcard book! I wanted to make more. I think a second set would be fun so he can also use them as matching cards but I ran out of the cream felt. Maybe I will have to go to JoAnns shopping (dang it!! Lol). As for right now at least we can work on our numbers, shapes and colors.


One of the very best parts about making you kids things rather than buying them all is when they say "Mommy made it!" So sweet!


Even if you don't have all the supplies on hand this project would still be really cheap to make. Also if your making them for little hands like I am you don't have to worry about your flashcards ripping... My kids are little and pretty rough on things...Paper doesn't last long in this house.


We have been doing really good at "Home-PreK." I had the good idea from a friend who also has a husband in Pharmacy school. She has a daughter who is just older than Ty and when her husband has to study or do homework...(Something Jayson does a lot of) they also have homework or study time. So now in the morning we all eat breakfast together and get ready. Then when daddy is off to school we start school. We do about a half hour (as much as Ty can take) of learning. Then we try to have singing time, snack time and then back to learning time. He thinks its pretty cool when I tell him daddy is at school learning too....even though I am pretty sure Jayson isn't having singing time.  


Ember isn't really learning her numbers, shapes or colors....but she does like to flip through the pages... She is still learning though...just like looking at a book. Seeing new shapes and colors is good for her little brain. It also keeps her entertained for awhile!

Wednesday, September 4, 2013

DIY pillow dolls


For Embers birthday this year I made her some pillow dolls. I actually got the idea from church dolls...basically the same thing but much much smaller. I though this would be a fun way to throw pillows in her crib or to take on road trips.


Excuse the crappy phone pictures but I wasn't planning on doing a full tutorial. Here is the run down though. Measure out any size you want for the body. See how my guy doll and girl doll are different sizes... yeah that is because that just happened to be the scrap sized I had on hand. Then use muslin fabric for the face. Measure out the same width but make the height smaller, obviously. Just whatever looks good to you. Then I took some felt and cut out hair. Spray it on with basting spray just so it wont move around when you sew it. I used quilting floss to sew on the hair, face and cheeks. Use a fabric pen with disappearing ink to draw on the face. I also used it to draw on where I wanted the cheeks. I used flannel for the girl cheeks and after she was done quickly realized felt is way better.....doesn't frey. So Mr. Sleep has nice felt cheeks. Miss Sleepy needed a bow to make her a little more girly. So I went to Embers stash and found a cute pink one. Then sew on your back piece inside out.... all but one inch. Then flip it right side in and stuff it.


I was all out of Polly fill and because I decided to make these with 100% already on hand materials I took out some of my quilt bat and pulled it to shreds. Then had my little man help me out. Pulled it nice and loose then stuffed it in and sewed the hole back up.


Ty actually loves them as much as Ember. They were both originally for Ember but I think Ty will keep the Mr.


Sorry for the terrible tutorial. If you have any questions on how to make them I would love to answer, just email me!  

They are soft, simple and sweet! I think they are perfect for a wide range of ages and look adorable in the crib.


Linking up here:
keepingitsimplecrafts.com
skiptomylou.org
craft-o-maniac.com
creatingreallyawesomefreethings.com
madincrafts.com
ishouldbemoppingthefloor.com